In the world of automotive aftermarket modifications, few projects balance the fine line between extreme performance and OEM-style integration as delicately as a custom audio build. For enthusiast "Giles," a member of the CarAudio.com community, the mission was clear: upgrade from a dual-subwoofer setup to a high-output, competition-grade system without sacrificing the utility of his 3rd Generation Toyota Tacoma’s interior. This project, documented as "3rd Gen Tacoma Round 2," offers a masterclass in electrical infrastructure, spatial efficiency, and the inevitable "blood, sweat, and gears" reality of DIY mechanical work.

Main Facts: The Scope of the Transformation
The project centers on the comprehensive overhaul of an existing sound system that had begun to exceed the electrical limitations of the vehicle. The original setup—consisting of two Kicker L7T 12-inch subwoofers—provided a solid baseline, but the owner sought greater output. The primary objectives were:

- Electrical System Overhaul: Replacing the factory alternator with a massive 370A unit to prevent power cable melt-down and voltage sag.
- Space Management: Keeping the back seats fully functional while hiding all audio equipment to maintain a stock, "sleeper" appearance.
- Component Integration: Utilizing high-end B2 Audio Rampage 6.5-inch drivers paired with passive radiators.
- Strategic Wiring: Implementing custom distribution blocks for remote signals and power to maintain serviceability.
The build represents a common transition for audio enthusiasts: moving from "off-the-shelf" components to a bespoke, engineered electrical and acoustic environment.

Chronology of the Build: A Trial by Fire and Wrench
The journey of the "Round 2" Tacoma began in late August 2026. What started as a simple desire to "go bigger" quickly evolved into a multi-week technical project.

Phase 1: The Electrical Foundation
By August 30, the project hit its first critical milestone. The owner identified that his current setup was literally melting power cables—a classic sign of an under-supported electrical system. The solution was a high-output 370A alternator sourced from a Toyota Highlander and adapted to fit the Tacoma. This upgrade was the linchpin of the entire build, ensuring that the future amplifier bank would have the current required for high-excursion bass.

Phase 2: The "Great Abyss" Incident
In early September, the project faced a significant setback that many DIYers fear. While working under the hood, a 10-inch crescent wrench slipped and vanished into the "Great Abyss"—the engine bay’s complex architecture. The search for the tool required the removal of skid plates and nearly two hours of troubleshooting. The wrench was eventually located in the radiator fan housing, highlighting the hazards of working in the cramped quarters of a modern mid-size truck.

Phase 3: Interior Fabrication and Wiring
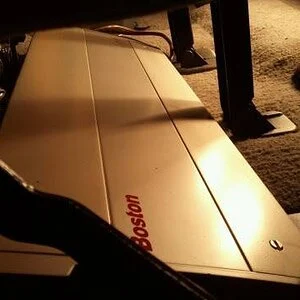
By mid-September, the focus shifted to the interior. The owner removed the center console and carpeting to route high-gauge wiring. The goal was to create a clean, organized junction system. He utilized distinct color-coded distribution boxes: black for remote signal management and red for 12V power distribution. This phase also involved the construction of a custom amplifier rack under the rear seat, featuring integrated 4-inch cooling fans to combat the heat generated by a 4,000-watt amplifier footprint.

Supporting Data: Why Electrical Infrastructure Matters
In professional car audio, the "Big Three" (alternator, battery, and ground) are the lifeblood of a system. The Tacoma’s move to a 370A alternator is a significant jump from factory specifications, which typically hover between 100A and 130A.

The choice of B2 Audio Rampage 6.5-inch drivers with passive radiators is a sophisticated engineering decision. Passive radiators allow for deep, resonant bass response in enclosures that would otherwise be too small for traditional porting. By using four of these in an under-seat configuration, the owner achieves the air displacement of much larger subs while keeping the enclosure height low enough to maintain full rear-seat travel.

Furthermore, the integration of an AudioControl DSP (Digital Signal Processor) allows the owner to split the frequency range, sending specific signals to the tweeters and mid-bass drivers independently. This level of control is what separates "loud" systems from "accurate" systems.

Official Community Perspectives and Best Practices
The project has garnered significant attention within the CarAudio.com community, with veteran members weighing in on the pitfalls of such a complex install.

- Safety Protocols: Experienced users, such as "Old_Slapper," emphasized that dropping tools into the radiator shroud is a rite of passage. However, they warned that failing to retrieve them is a recipe for disaster. As user "slater" noted, a tool left in the fan shroud often ends up being launched through the radiator core the moment the vehicle hits a bump, resulting in a costly cooling system failure.
- Attention to Detail: Community feedback has been largely positive, with members noting that the methodical approach to wire routing and component mounting is "pleasing to watch." The use of cable glands and rubber-coated trays suggests a level of professionalism that often distinguishes high-end builds from amateur attempts.
Implications: The Future of the "Sleeper" Build
The "Round 2" build serves as a case study for modern vehicle modification. It demonstrates that the limitation of space—a common complaint among Tacoma owners—is not an insurmountable barrier to high-end audio performance.

The "Sleeper" Philosophy
The implication of this build is that the "sleeper" aesthetic—where the vehicle appears entirely stock from the outside—is the new gold standard for enthusiasts. By hiding the battery bank, custom racks, and high-output electrical components under the seats and behind factory panels, the owner ensures that the vehicle remains a daily driver.

The "Epiclink" Dilemma
A recurring theme in the build is the owner’s humorous realization that he has "over-engineered" the remote wiring, leading to a surplus of cables. In the car audio hobby, this often results in a "buy a new thing" cycle. Having an extra remote wire "just in case" inevitably leads to the purchase of an additional accessory—a phenomenon the owner jokingly dubbed "Epiclink." This illustrates the addictive nature of car audio, where one upgrade necessitates another, creating a constant state of flux and improvement.

Final Technical Outlook
As the build heads toward its final stages, the focus will shift to final tuning. The transition from passive crossovers to active DSP-controlled amplification is a significant step forward. By powering the tweeters separately from the components, the owner gains granular control over the soundstage, allowing for precise imaging that is impossible to achieve with standard passive crossovers.

In conclusion, the 3rd Gen Tacoma Round 2 project is more than just a subwoofer upgrade. It is an exercise in meticulous planning, electrical engineering, and creative problem-solving. Whether it is the adaptation of a Highlander alternator or the custom fabrication of cooling-fan-equipped amp racks, the project showcases the ingenuity of the DIY community. As the owner prepares to drive his fully upgraded vehicle, the success of this build stands as a testament to the idea that with enough patience, specialized tools, and a bit of luck regarding lost wrenches, any vehicle can be transformed into a mobile high-fidelity masterpiece.