In the world of high-performance car audio, the Rockford Fosgate 1500.1bdcp stands as a benchmark for raw power and efficient Class BD amplification. However, even the most robust equipment can succumb to electronic failure over years of service. Recently, a technical case study emerged on the DIYAudio community forums, providing a granular look at the diagnostic process required to breathe life back into one of these legendary monoblock amplifiers.
This report documents the systematic troubleshooting journey of a user dealing with a "no-audio" output issue, guided by industry-renowned repair expert Perry Babin. This technical breakdown serves as a masterclass in amplifier repair, illustrating the complexities of modern board-level diagnostics.
The Core Issue: Silence in the Powerhouse
The primary symptom reported by user rhempz01 was deceptively simple: the amplifier appeared to function perfectly in terms of power-on status, but it failed to produce any audio output. Initial observations confirmed that a 40Hz test signal was successfully traversing the vertical driver boards, yet the signal was not reaching the output stage or translating into speaker movement.
For any technician, the first step is always verification. Before diving into component-level replacement, one must determine if the "heart" of the signal—the audio waveform—is actually present at the input pins of the driver boards. If the signal is lost before it reaches these critical components, the rest of the amplifier becomes irrelevant.
Chronology of the Diagnostic Process
Phase I: Initial Signal Tracing
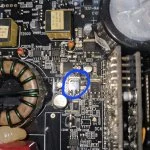
The troubleshooting began on May 12, 2026. After confirming that the 40Hz signal was indeed present throughout the vertical cards, the focus shifted to the power supply regulators. A functioning amplifier requires precise voltage rails to operate the sensitive circuitry within the driver stage.

rhempz01 reported irregular readings: -1.32V on the right leg (RL) and a nominal 0.19V on the left leg (LL). These discrepancies were the "smoking gun." In a balanced amplifier design, significant voltage deviations between corresponding components are rarely normal and almost always point to a component failure upstream or in the immediate vicinity of the regulator.
Phase II: Transistor Scrutiny
Perry Babin, acting as the diagnostic lead, redirected the focus toward the transistors situated adjacent to the regulator board. By measuring the base, collector, and emitter voltages, the team aimed to isolate the faulty semiconductor.
The initial measurements provided by rhempz01 were:
- Transistor 1: B: -0.37V, C: -22.7V, E: -1.3V
- Transistor 2: B: -11.9V, C: -22.7V, E: -11.9V
These readings highlighted a severe imbalance. A transistor functioning correctly should show predictable voltage drops across its junctions. The wide disparity between the base and emitter voltages suggested that one of these components was either shorted internally or open, preventing the proper regulation of the voltage rail.
Phase III: The "Meter Lead" Misstep
A common pitfall in advanced electronics repair is the misinterpretation of meter data, often caused by user error in lead placement. During the investigation, it was discovered that rhempz01 had been misconfiguring the multimeter leads. This necessitated a reset of the data collection process. Once the leads were corrected, the voltages were re-measured, confirming that the issue was indeed persistent and consistent across the positive and negative rails.

Phase IV: The Resoldering Attempt
On May 13, rhempz01 attempted to desolder and resolder the suspicious transistors to ensure that "cold solder joints" (a common issue in high-vibration automotive environments) were not the culprit.
The result was immediate and alarming. Upon reconnecting power, the amplifier began pulling excessive current, causing the power supply to current-limit and drop the rail voltage to 10.4V at 3 Amps. This indicated that the act of reseating the component had caused a full short, confirming that the transistor was fundamentally defective and likely leaking current pathologically.
Phase V: Final Replacement and Persistent Voltage Drops
After ordering a replacement component from DigiKey, rhempz01 successfully installed the new transistor. However, the saga did not end there. Upon startup, the rail voltage—which should be stable—began to drop from the target 22V down to 13.2V after only a few seconds. Furthermore, 8.2V was measured across resistor R2035, suggesting that the circuit was still struggling to maintain equilibrium under load.
Supporting Data: Understanding the Class BD Architecture
The Rockford Fosgate 1500.1bdcp utilizes a "Class BD" design, which is a proprietary topology intended to maximize efficiency without sacrificing the sound quality associated with traditional Class AB amplifiers.
The Role of the Driver Board
The vertical driver boards are the "brains" of the operation. They handle the PWM (Pulse Width Modulation) signal conversion. When these boards receive a signal, they must be powered by perfectly regulated DC voltages. If the voltage regulators (which rhempz01 was testing) fail, the driver boards cannot switch the output MOSFETs correctly, resulting in the "silent" output observed.

Voltage Regulation and R2035
Resistor R2035 acts as a current-limiting or reference resistor in this specific circuit. The fact that 8.2V was present across this resistor indicates a high current draw. In a healthy state, the voltage across such a resistor should be significantly lower. The persistence of this issue after replacing the transistor suggests that the failure of the original transistor may have been caused by—or caused—a secondary failure in the surrounding passive components, such as a leaky capacitor or a damaged trace.
Official Perspective and Diagnostic Best Practices
While there is no "official" manufacturer statement on this specific repair, the guidance provided by experienced technicians like Perry Babin highlights the industry-standard approach to repairing high-end Class D/BD amplifiers:
- Isolation: Never assume a component is good just because it looks intact.
- Voltage Mapping: Always document voltages on a grid. Compare the "Left" and "Right" sides of the board. If they are not mirror images, you have found the fault area.
- Current Limiting: Always use a current-limited power supply during the initial test phase. As demonstrated by rhempz01, this prevents the amplifier from "self-destructing" when a short-circuit is still present.
- Component Integrity: When a transistor fails, it rarely fails alone. Always check the resistors and diodes connected to the base and emitter of the failed transistor.
Implications for Enthusiasts and Repair Technicians
This case study carries several implications for the car audio community:
- Longevity of Legacy Gear: The Rockford Fosgate 1500.1bdcp is a high-value piece of equipment. Repairing it is often more cost-effective than replacing it with modern budget amplifiers that may lack the same build quality.
- The Difficulty of "Intermittent" Failure: Electronics do not always fail in a binary way (on/off). As seen here, a transistor can fail in a way that allows the amp to stay in "protect" or "idle" mode without ever producing sound.
- Skill Requirements: This level of repair requires more than basic soldering skills. It requires a deep understanding of circuit theory, the ability to read complex schematics, and the patience to troubleshoot a path component by component.
Final Thoughts
The journey of rhempz01 is far from over. While the primary defective transistor was identified and replaced, the persistent voltage sag indicates that the amplifier’s power stage is still fighting an internal battle. The next logical steps involve examining the load connected to the output stage and checking for parasitic oscillation.
For those attempting similar repairs, the lesson is clear: Patience and systematic measurement are the only ways to win. Whether it is a failing regulator or a stubborn resistor, the solution is always hidden in the numbers. When the math doesn’t add up—as it didn’t for rhempz01—the fault is always waiting to be found.

As of the latest update, the community continues to offer technical support, proving that even with discontinued hardware, the collective knowledge of the DIY audio community remains a vital resource for keeping high-performance systems alive in the 21st century.