
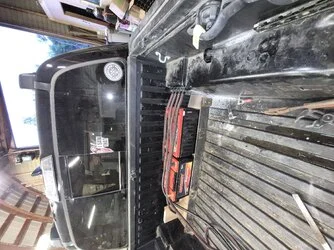
In the world of custom car audio, the line between a hobbyist project and a professional-grade installation is often drawn by the attention to detail—specifically, the unseen work that occurs behind the panels. A recent build project, documented extensively by an enthusiast known as "Giles" on the CarAudio.com forums, highlights the complexities of modern vehicle integration. The project, titled "3rd Gen Tacoma – Round 2," serves as a case study for the lengths to which audiophiles will go to maintain factory aesthetics while achieving massive power output in a compact space.

Main Facts: The Pursuit of "Invisible" Power
The core objective of this build is to overhaul the electrical and acoustic infrastructure of a 3rd Generation Toyota Tacoma. The owner’s primary requirements were twofold: maximize audio performance beyond the previous dual-Kicker L7T 12-inch setup, and maintain a completely "stock" visual appearance, ensuring the rear seats remain functional and all equipment is hidden.

To achieve this, the builder is undertaking a comprehensive electrical system upgrade, transitioning from factory limitations to a robust, high-amperage power supply capable of supporting a 4,000-watt amplifier. This integration requires significant fabrication, including a custom under-seat amplifier rack featuring integrated cooling solutions and a sophisticated battery bank architecture.

Chronology of the Build: From Electrical Overload to Precision Fabrication
Phase 1: Identifying the Bottleneck
The project began in late August 2026, when the owner noted that the existing audio system was melting power cables—a clear indicator that the stock electrical system was unable to handle the current draw. The realization prompted an immediate shift from a simple subwoofer upgrade to a complete system rebuild.

Phase 2: Electrical Infrastructure
The first major milestone involved the installation of a 370-amp high-output alternator, sourced from a Toyota Highlander and adapted for the Tacoma platform with the help of "Lo Cost Electrical" in Calgary. The installation was described as a significant challenge due to the massive size difference between the stock unit and the high-output aftermarket component.

By the end of August, the focus shifted to the "battery bank" integration. The owner utilized welding-grade cabling and high-quality Oxygen-Free Copper (OFC) wiring to ensure the massive current flow could be safely managed. This phase was characterized by "lots of cables" and the meticulous routing of power through the chassis, ensuring that no components were compromised by heat or vibration.

Phase 3: Fabrication and Setbacks
In early September, the build moved to the interior. The owner began constructing a custom amplifier rack to be mounted beneath the rear seats. A critical design feature of this rack is the inclusion of dedicated mounting points for 4-inch cooling fans, essential for maintaining the longevity of the high-power equipment in a confined space.

The build hit a significant hurdle on September 3, 2026, when a 10-inch crescent wrench was dropped into the engine bay. The tool vanished into the "Great Abyss" of the radiator fan housing. This necessitated two hours of intensive work, including the removal of skid plates, to retrieve the wrench before it could cause catastrophic damage to the vehicle’s cooling system.

Following the recovery, the owner successfully opened the wheel wells for cable routing, installed cable glands for weatherproofing, and applied a protective rubberized coating to the wooden battery and fuse tray.

Supporting Data: The Technical Specs
While the build is still in progress, the technical specifications provided by the owner demonstrate a high level of system planning:

- Alternator Output: 370 Amps (Custom adapted from a Toyota Highlander).
- Power Goal: 4,000 Watts (Amplifier target).
- Amplifier Constraints: Must be under 7 inches in width to fit the custom-designed under-seat enclosure.
- Speaker Configuration: 4 B2 Audio "Rampage" 6.5-inch drivers utilizing passive radiators.
- Cooling System: Integrated 4-inch forced-air ventilation for the amplifier rack.
The use of passive radiators in a 6.5-inch configuration suggests a focus on mid-bass punch and efficiency, aiming to replicate the output of larger subwoofers while minimizing the volume of air required for the enclosure.

Community and Expert Commentary
The build has garnered significant interest within the CarAudio.com community, with seasoned veterans weighing in on the challenges and successes of the project. User 1aespinoza noted the "attention to detail," suggesting that the meticulous nature of the installation is a benchmark for quality.

However, the "wrench incident" served as a cautionary tale for the community. User maylar recounted a personal anecdote involving a hammer found in a Lincoln Continental after two years, while Old_Slapper and slater provided technical insight into the dangers of dropped tools. Slater specifically warned of the "home-run" scenario: where a loose tool resting in a radiator shroud is launched by the cooling fan, effectively destroying the radiator. This serves as a stark reminder of the professional risk involved in high-end automotive modifications.

Implications: The Future of "Stealth" Audio
This build highlights a growing trend in the automotive aftermarket: "Stealth Integration." As vehicle interiors become more complex and space-constrained, the demand for high-output, low-profile systems has spiked.

1. Electrical Sustainability
The project emphasizes that audio upgrades are only as good as the electrical system supporting them. The transition to a 370A alternator is a prerequisite for any serious system exceeding 2,000 watts, yet many enthusiasts overlook this, leading to the "melted cables" seen in the early stages of this build.

2. Thermal Management
By incorporating forced-air cooling (4-inch fans) into a custom under-seat rack, the owner is addressing the most common failure point in modern car audio: heat soak. Without active ventilation, amplifiers hidden under seats—where there is zero airflow—often go into thermal protection mode or fail prematurely.

3. The DIY Ethos
The project is a testament to the "do-it-yourself" spirit. Despite the setbacks and the complex engineering required to adapt parts from different vehicles, the owner has remained committed to the goal of a clean, stock-looking interior. The willingness to fabricate custom wood trays, apply specialized coatings, and endure the frustration of lost tools highlights the dedication required to perform high-level automotive work.

4. Safety and Professionalism
The discussion regarding the lost wrench serves as an unintentional "safety briefing" for the community. It underscores that even the most well-planned projects are susceptible to human error. The community response suggests that the sharing of such failures is as valuable to the hobby as the sharing of successes, as it provides a roadmap for others to avoid the same costly mistakes.

Conclusion
As the build enters a temporary hiatus while the owner completes a two-week work shift, the project stands as a prime example of methodical, high-stakes automotive engineering. By prioritizing electrical capacity, thermal management, and a non-invasive aesthetic, the builder is setting a high bar for 3rd Generation Tacoma owners. Whether the system will ultimately achieve the 4,000-watt target without compromising the vehicle’s integrity remains to be seen, but the foundation laid thus far is one of professional-grade precision and thoughtful design. The community awaits the final stages of the installation, which will likely serve as a blueprint for others looking to upgrade their audio without sacrificing the utility of their truck.